|
Written by
Fred Engler
Contents
Introduction
Coloring entities
Creating a new track
Resizing a track
Moving a track
Hiding entities
Filtering by remark
Removing a track
Row policies
Searching
Saving the contig layout
Viewing help
Please download the fpc file used in
this demo by clicking here.
Untar the file in the desired directory with:
tar zxvf ctgdemo.tar.gz
Start FPC with the demo file by typing
fpc ctgdemo
on the command line. Follow the normal steps to open contig 1 (the
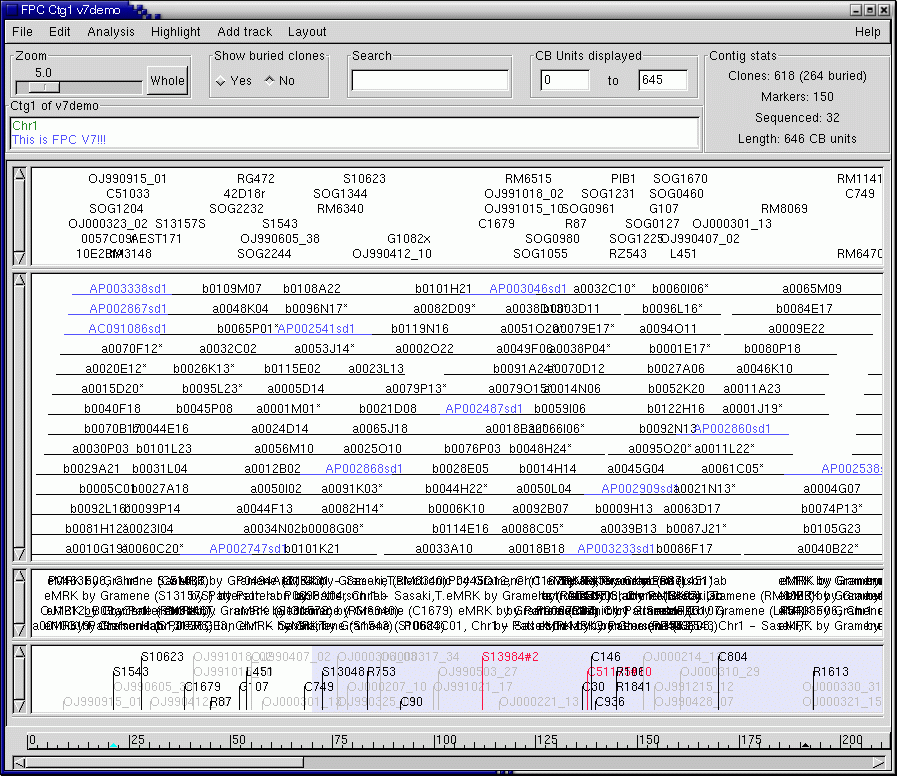
only contig in the project). You are presented with the new contig
display:

The main part of the window is broken into four sections. Each of
these sections is called a track, and you determine exactly how many
tracks are shown, and what is shown in each track. A track can contain
either 1) markers, 2) clones, 3) remarks, 4) anchors or 5) sequence
which has been aligned to the FPC map using the Draft Sequence
Integration module. Use the horizontal
scrollbar at the botton to scroll through the contig. You will notice
that the bottom (anchor) track does not scroll; instead, a viewer
(white area) moves over it, indicating which portion of the contig
is currently shown. The ruler immediately above the scrollbar indicates
the scale of the contig in CB (consensus band) units. Change the zoom in the top left,
either by ckicking on the bar and moving it, or clicking in the space
beside the bar. Click 'Whole' to see all clones made to fit in the
currently viewable area. It will be quite dense! Zoom out to a more
reasonable scale.
Right-click on the first (marker) track. A menu will appear, giving
you three options: 'Edit track properties', 'Remove track', and 'Close
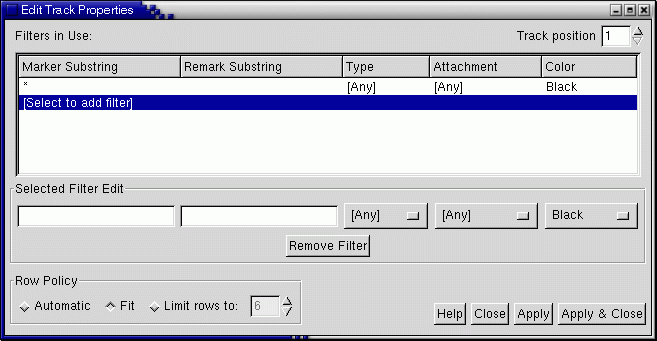
contig'. Select 'Edit track properties'. A window opens, showing you,
among other things, which filters are currently applied to the track:

In the 'Selected Filter Edit' box, click on the first option menu
(under the 'Type' column). A list of marker types is shown. Select
'eMrk' from the list. A new filter is created, as shown by the new
row in the filters list. Next, select 'blue' from the 'Color' option
menu. When you are done, click on the 'Apply & Close' button. All
markers of type eMrk are now colored blue!
From the 'Add track' menu at the top, select 'New clone track'. A
new track containing clones is created and appended to the bottom
of the track window. Use the vertical scrollbar appearing on the right
to move to it. Right-click on an empty part of the track (not on or
close to a clone), and select 'Edit track properties' from the menu.
If this is not an option, move the mouse a little, as you probably
clicked too close to a clone. Click on the first row in the list,
and select 'Finished' from the 'Status' option menu. Click 'Apply
& Close'. The track now shows only clones that have a 'Finished' status!
Move the mouse towards the bottom of the newly created track to where
the cursor changes. Click and drag upwards with the mouse until the
track is about one inch tall. Release the mouse button, and the track
is resized to the new height.
Once again, open the Edit Track Properties window on the newly created
track. We want to place this track immediately above the current clone
track. Select '2' from the 'Track position' spin button at the top
right. Click 'Apply & Close'. The track is now moved to the second
position in the window.
Open the Edit Track Properties window for the original clone track.
Since the finished clones now have their own track, they no longer
need to be shown in this track. Click on the second row in the list,
and set the 'Color' option menu to 'Invisible'. Click 'Apply & Close'.
The finished clones are no longer shown!
Open the Edit track Properties window for the finished clone track.
In the 'Remark Substring' text box, type "Sasaki" and select 'Green'
as the color. Click 'Apply & Close'. All clones containing 'Sasaki'
in their remarks are colored green. This makes it easy to see which
lab sequenced the clone.
Right-click on the remark track (2nd track from the bottom; should
now be 4th from the top) and select 'Remove track'. You will be prompted
whether you really want to remove the track. Click 'Yes'. The track
is removed from the display. It can be recreated at any time via the
'Add track' menu.
Notice that some clones are written on top of each other in the original
clone track. This is because there are not enough rows to correctly
display the clones with the current track height. One solution is
to resize the track. Another is to allow a "per track" scrollbar (the
one on the left). Open the Edit Track Properties window for the original
clone track. From the 'Row Policy' box, select 'Automatic'. Click
'Apply & Close'. The clones will be reorganized so that none are written
on top of each other. Use the vertical scrollbar on the left-hand
side of the track to scroll through the clones. You may also try resizing
the track. Experiment!
You can search for a substring of any entity in any of the current
tracks, and all matches will be highlighted in orange (except for
anchor tracks). Type "SOG" in the 'Search' text entry at the top of
the window. You will see all markers with this string in their name
highlighted. Experiment with other strings. To clear all highlights,
select 'Clear all' from the 'Highlight' menu.
Saving
the contig layout Back to top
You can store the way you have arranged the current contig. There
are three ways to save layouts: 1) For this contig only, 2) For all
contigs, and 3) For all contigs without a previously saved layout
(Make this one the default layout). Either of the three works in our
case. Select one option from the 'Layout' menu. The layout information
is stored for the current session. If you want this layout when you
reopen FPC, click on the 'Save .fpc' button on the Main Menu window.
Otherwise, the previously saved (or default) layout will be used when
the project is reopened.
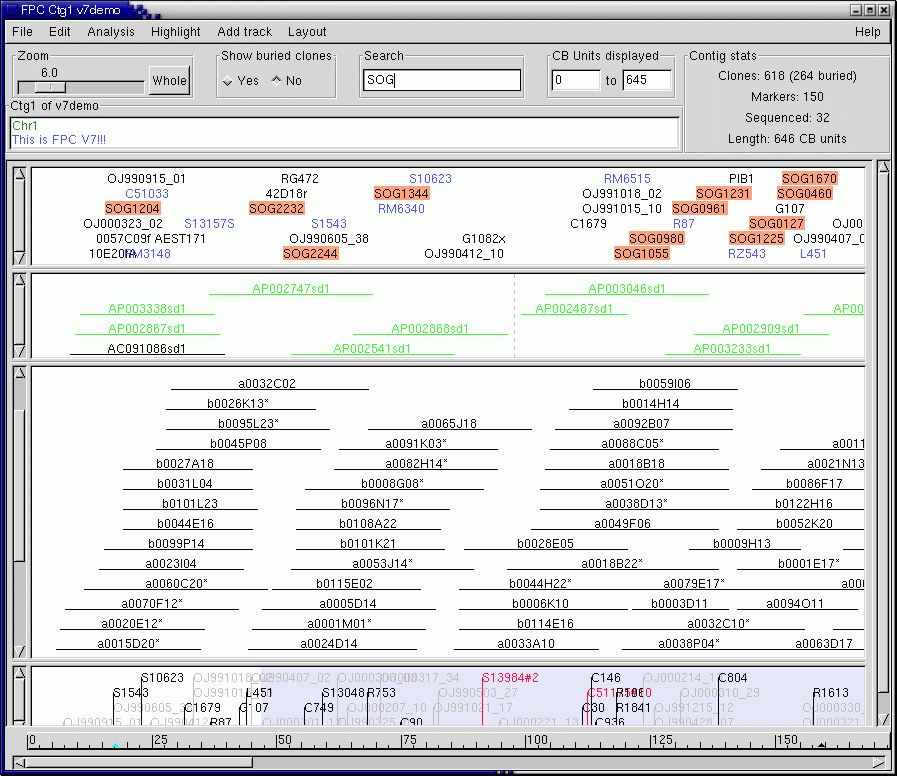
Here is what the display should look like when you're done:

There are several help pages in FPC to guide you along. You can get
to these by clicking on the 'Help' buttons (or 'Show help' from the
'Help' menu for the contig display). However, this requires that the
FPCHELP environment variable be set to the location of the help file.
For example, at AGCoL the help file is located in /home/agcol/fpc/, so we set
the environment variable as follows:
setenv FPCHELP /home/agcol/fpc/
Set your FPCHELP to where it is located on your system.
You may want to consider adding this line to your .cshrc file. If
FPCHELP is not set, you will be prompted for the file location when
you click on a help button. |


