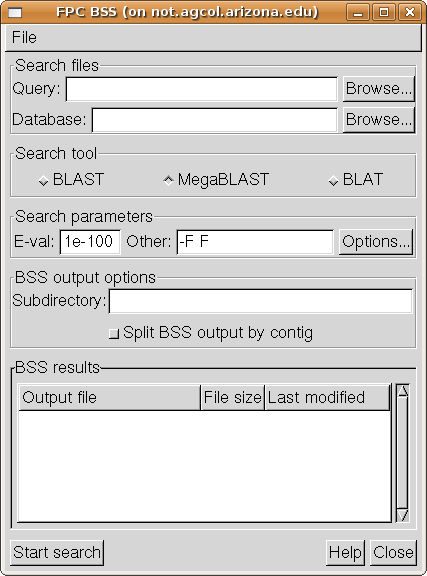
2.2. Filtering and adding to FPC
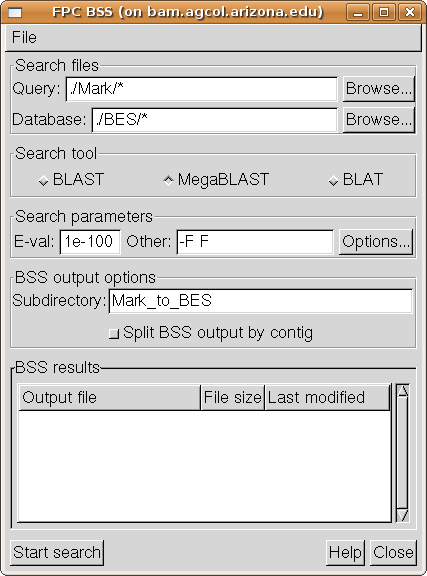
The "BSS Results" section at the bottom of the BSS window should now
list the subdirectory "Mark_to_BES" which we chose for the results:
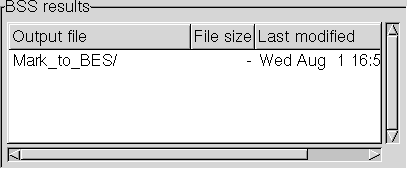
Double-clicking on this directory
causes its contents to be listed, namely the two BSS output files
resulting from our search:
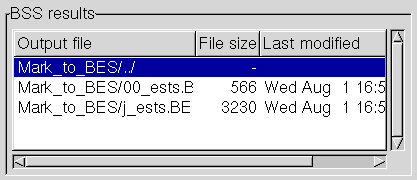
There are two output files, one for each of the marker query files in the "Mark"
directory. (BSS always generates a separate output file for each input query file).
Clicking on a file selects it, and it may then be deleted using the "File" menu
at the top of the window. Double-clicking on a file opens it into its own display.
Note that you can widen the "Output file" column to see the whole filenames.
In our search, the first file, named "00_ests.BES.bss", has no hits, while
the second, "j_ests.BES.bss", has 12.
Double-click on "j_ests.BES.bss", and
you should see a new window, the Results window for this search:
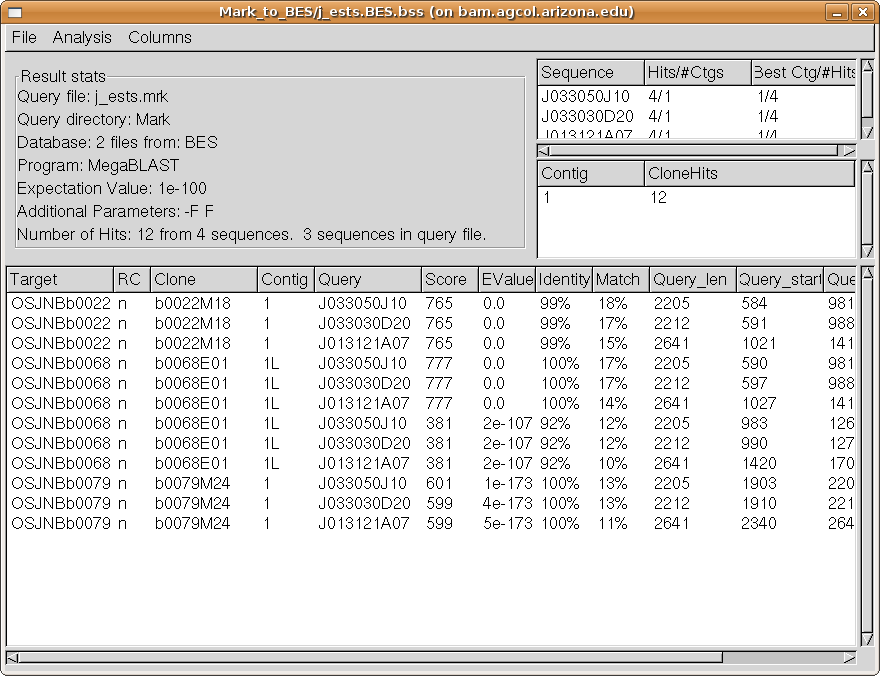
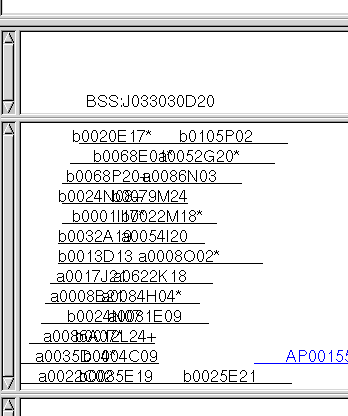
We see from the Query Hits summary table (upper right, top table) that each marker had
four hits and each hit exactly one contig (second column). The best contig for each was
contig 1, and each had four hits to contig 1 (third column).
From the Contig Hits summary table (upper right, second table), we see
that contig 1 received 12 hits from our search. We can easily visualize
these hits within FPC displays, as follows:
First, we open an FPC "keyset" of the clones which had hits (see the FPC documentation
for more information on keysets). To open the keyset,
choose "View keyset of hit clones" from the Analysis menu.
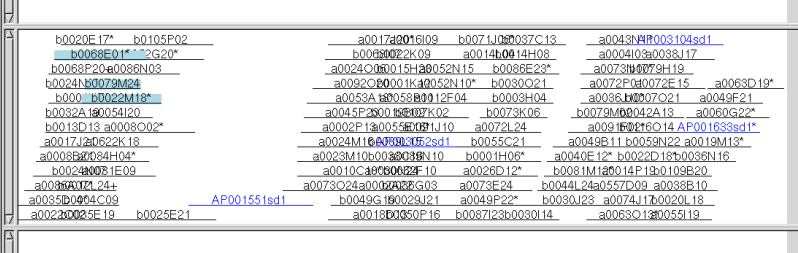
You should see an FPC window containing 3 clones.
Next, click on the contig 1 line (the only line) of the
Contig Hit summary table. The FPC contig display of contig 1 will open.
Finally, on the FPC contig display, choose "Select Keyset" from
the Highlight menu. The three clones which had hits in our search are
highlighted. Your contig display should look as follows:
Now close the contig display and keyset and we will
explore the analysis tools available through the BSS Results view.
The simplest tool is sorting. Clicking on any column header of any one of the
three tables causes the rows of the table to be sorted according to that column.
For example, click on the Score column of the Hits table;
the hit entries are now sorted by score, lowest to highest. Probably we would prefer to
sort them highest-to-lowest, and this is accomplished by
holding down the shift key and clicking on the Score column.
A shift-click always sorts in the reverse order to a click. The sorting is alphabetic
or numeric, depending on the type of data in the column.
Multiple sorts are accomplished by simply clicking several columns in a row.
For example, now shift-click the Score column and then
click the Query column. Now the hits are ordered by query name,
and secondarily by score, so for each query the hits are in high-to-low order of score.
In addition to sorting columns, columns may also be hidden using the Columns menu
at the top of the BSS window. The menu contains a checkbox for each column, allowing
the column to be shown or hidden. If you choose "Save for spreadsheet" from the File menu,
then hidden columns are not saved to the spreadsheet table; however, if you save
the BSS file and reopen it, hidden columns are restored. Hiding columns does not
remove any data permanently from the BSS File.
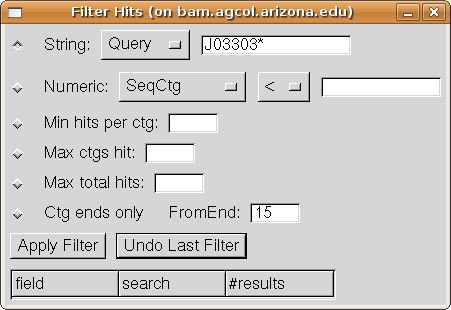
Next we will look at the filtering tool. Select "Filter hits" from
the Analysis menu, and the Filter dialog will open:
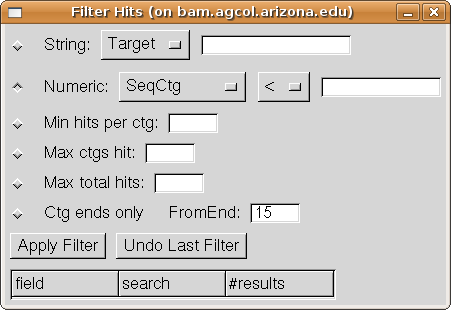
The dialog contains six different types of filter, which you can apply one after
another and then undo if desired. To select a filter type, press the button to
the left of its line. We will filter first by sequence name, so
select the "String" filter option and then choose
"Query" on its drop-down menu of column choices. Enter
"J03303*" in the String text box. This signifies to keep only hits
for which the Query column value starts with "J03303". (If we leave
off the "*", then it will keep only hits with exact name J03303).
Your Filter dialog should now look like:
Press the "Apply Filter" button, and the Hits table in
the Results window changes to show only the four hits for Sequence J033030D20.
Also, the Filter history table at the bottom of the Filter dialog acquires an
entry showing the filter which was applied.
Press the "Undo Last Filter" button, to undo the last filter;
now the Results window shows all the hits once again.
Press the "Apply Filter" button to reapply the filter.
Now we will add another filter, to find only the hits which are to the end of a contig
(this would be useful e.g. for finding evidence for contig merges).
select the "Ctg ends only" option on the Filter dialog, and Apply
Filter. Now the Hits table shows only two hits, and they are both
to clone b0068E10 on the left end of contig
one (indicated by the "1L" in the Contig column). Note that the "Ctg ends" filter
has a numeric parameter "FromEnd"; this tells how close to the end of the contig, in CB units,
the hit clone must be to qualify as being at an end (see FPC documentation for explanation
of CB units).
These two hits also illustrate how MegaBLAST (and BLAST) divide hits which span introns.
Looking at Targ_start,Targ_end (the last two columns) we see that the first hit
ends at basepair 406 on the BES, while the second hit starts at 547. Given that
the query is an EST sequence, the gap of 141 basepairs is very likely to be an intron.
Using Blat, these two hits would have been reported as one, with
a value of 141 in the "Intron" column.
Press the "Undo Last Filter" button to undo the "Ctg ends" filter.
The Hits table now shows four hits once again. Let us find all hits with score
greater than 600.
Select the "Numeric" filter option and then choose
"Score" on its first drop-down menu (of column choices). Choose ">" in the second
drop down menu (of comparison options). Enter "600" the text box.
Your Filter dialog should now look like:
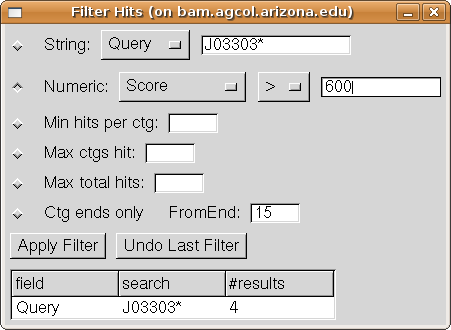
Press the "Apply Filter" button. Now the Hits table
shows two hits, namely the hits of J033030D20 having score greater than 600.
Both filters we applied are listed in the filter history list on the Filter dialog,
and we could undo them by pressing "Undo Last Filter" twice. However, we will
instead add these hits to the FPC map.
Adding hits to the FPC map as markers, remarks, or "FP remarks" allows us to
store and visualize the results of BSS alignments. The different categories
have different purposes, as follows:
Markers
A marker generally indicates a gene or other genomic sequence property (such as an SSR)
which can be identified and genetically mapped.
Markers within FPC have a number of defined types; those added through BSS have
type "eMRK".
Remarks
Remarks are used for any other kind of annotation which one wants to be visible to every user
of the FPC map.
FP Remarks
FP Remarks are remarks intended for a smaller audience, e.g. remarks concerning the
assembly of the FPC map. Typically these remarks are not shown by default (although
all users can see them, if they desire.)
Choose the "Add Hits to FPC" entry from the Analysis menu.
The Add Hits dialog comes up:
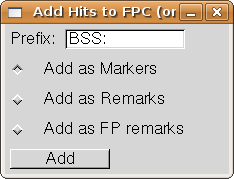
The "Prefix" entry allows you to choose a prefix to be added to the
sequence name. The two together become the marker name, remark, or fp remark.
This allows you to locate the added markers or remarks at a later time using the
FPC search functions.
We will use the default Prefix and the Markers category, so simply
press the "Add" button.
Now bring up the contig 1 FPC display again, and the new marker
is visible: